Some Uses For A Rotary Table
Like most tools and machine accessories once you
have a basic understanding of the operation of a rotary table the uses of this
device are limited only by your imagination and willingness to spend time making
setups and fixtures to hold your work on the RT.
The following photos are of a couple of projects
from my full time industrial model making days.
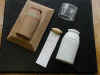
The first tool shown was for making about thirty
caps for a deodorant container project.
The mold was made of RTV (room temperature
vulcanizing rubber, a silicon based product). The compound I used was red
in color although different grades of RTV come in different colors. The
model cap is painted white and was machined from solid ABS plastic and used to
make the mold.
As I recall the only use of the RT on this
project was to make the vent holes in the mold. A number of holes in a
"bolt circle" pattern around the base of the master model. Just
the ticket for RT application.
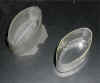
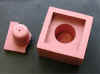 This shows the core (male) and cavity (female) parts of the mold. The core side
has taken some abuse over the years. It originally had a square base that
mated with the square recess in the cavity side. The core is placed into
the cavity and a two part liquid resin was poured into the mole through the
sprue in the center of the core. Careful examination of the core side
shows the vent holes around the threaded section. The mold was then placed
in a home brew pressure vessel made from an old pressure cooker and brought up
to about 25 psi. This collapses any air bubbles back into solution and
gives a nice solid part without any voids.
This shows the core (male) and cavity (female) parts of the mold. The core side
has taken some abuse over the years. It originally had a square base that
mated with the square recess in the cavity side. The core is placed into
the cavity and a two part liquid resin was poured into the mole through the
sprue in the center of the core. Careful examination of the core side
shows the vent holes around the threaded section. The mold was then placed
in a home brew pressure vessel made from an old pressure cooker and brought up
to about 25 psi. This collapses any air bubbles back into solution and
gives a nice solid part without any voids.
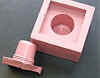
 This shows the part as it would have appeared after molding and setting up in
the pressure pot. Because this casting material was slow curing my cycle
time was one part per day. First thing in the morning I would remove the
previous days casting, clean up the mold and cast another part.
Then I would go on with whatever the panic of the day was. Anyone
who runs a small business knows that you swing from "Oh my God how are we
going to pay the bills to Oh my god how are we going to get these projects out
on schedule" and this usually takes place in the course of a
day.
This shows the part as it would have appeared after molding and setting up in
the pressure pot. Because this casting material was slow curing my cycle
time was one part per day. First thing in the morning I would remove the
previous days casting, clean up the mold and cast another part.
Then I would go on with whatever the panic of the day was. Anyone
who runs a small business knows that you swing from "Oh my God how are we
going to pay the bills to Oh my god how are we going to get these projects out
on schedule" and this usually takes place in the course of a
day.
 This shows the threads on the cap more clearly. I don't have any samples
but I also had to make the part that this cap mated to.
This shows the threads on the cap more clearly. I don't have any samples
but I also had to make the part that this cap mated to.
This next project has some real trick RT usage. The cap part of
this underarm deodorant container would have been simple to do on the CNC mills
I have access to now but then the tools at hand were a 9" SB lathe, a
Benchmaster vertical bench mill with a 6" rotary table and a BUNCH of
imagination.
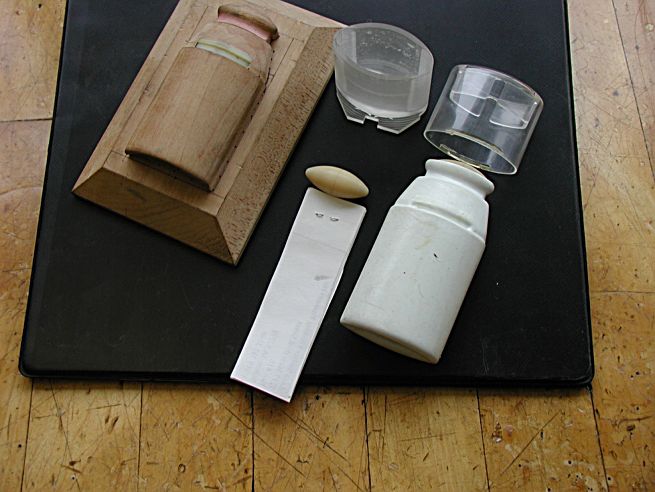
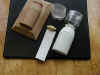
 This picture shows the container, the cap and the roller. Also shown is
the vacuum mold used to make the halves of the container. The white strip
in the center of the picture is just there to keep the roller from rolling onto
the floor. The container was made in two pieces and bonded together to
make the whole thing. Size was controlled carefully so that the roller
would spin freely but not fall our of its position. The outside thickness
had to be within a couple thousandths and the inside (that gripped the roller)
had to be spot on also. One or the other would have been easy. Holding
both was a chore.
This picture shows the container, the cap and the roller. Also shown is
the vacuum mold used to make the halves of the container. The white strip
in the center of the picture is just there to keep the roller from rolling onto
the floor. The container was made in two pieces and bonded together to
make the whole thing. Size was controlled carefully so that the roller
would spin freely but not fall our of its position. The outside thickness
had to be within a couple thousandths and the inside (that gripped the roller)
had to be spot on also. One or the other would have been easy. Holding
both was a chore.
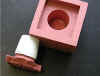
 Shown here is a sample pull off the vacuum molding machine (a bench top model
with not much more that a shop-vac sort of blower to provide the vacuum.
The mold is shown along side.
Shown here is a sample pull off the vacuum molding machine (a bench top model
with not much more that a shop-vac sort of blower to provide the vacuum.
The mold is shown along side.
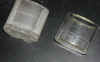
 Main feature of this picture is the partially machined cap along with a finished
cap. The cap was made on the rotary table.
Main feature of this picture is the partially machined cap along with a finished
cap. The cap was made on the rotary table.
 The cap was made on the RT by offsetting the squared up blank from the center
line of the RT the required amount, holding the blank on a simple fixture and
using the swing of the RT to create the necessary arcs. Notice the
machining marks left on the acrylic material in the rough part. The finish
part was polished back to full clarity using ordinary wet/dry papers followed by
abrasive cloths from http://www.micro-surface.com/
. These abrasives (comes in a kit) starts at 2000 grit and goes up to
12,000 grit. An excellent product for plastics.
The cap was made on the RT by offsetting the squared up blank from the center
line of the RT the required amount, holding the blank on a simple fixture and
using the swing of the RT to create the necessary arcs. Notice the
machining marks left on the acrylic material in the rough part. The finish
part was polished back to full clarity using ordinary wet/dry papers followed by
abrasive cloths from http://www.micro-surface.com/
. These abrasives (comes in a kit) starts at 2000 grit and goes up to
12,000 grit. An excellent product for plastics.
 The inner part in the finished cap is an insert also made on the RT. A RTV
gasket stretched over the inner part to provide a seal on the roller.
Sadly to the best of my knowledge this container was never made on a production
level.
The inner part in the finished cap is an insert also made on the RT. A RTV
gasket stretched over the inner part to provide a seal on the roller.
Sadly to the best of my knowledge this container was never made on a production
level.
 This shows the core (male) and cavity (female) parts of the mold. The core side
has taken some abuse over the years. It originally had a square base that
mated with the square recess in the cavity side. The core is placed into
the cavity and a two part liquid resin was poured into the mole through the
sprue in the center of the core. Careful examination of the core side
shows the vent holes around the threaded section. The mold was then placed
in a home brew pressure vessel made from an old pressure cooker and brought up
to about 25 psi. This collapses any air bubbles back into solution and
gives a nice solid part without any voids.
This shows the core (male) and cavity (female) parts of the mold. The core side
has taken some abuse over the years. It originally had a square base that
mated with the square recess in the cavity side. The core is placed into
the cavity and a two part liquid resin was poured into the mole through the
sprue in the center of the core. Careful examination of the core side
shows the vent holes around the threaded section. The mold was then placed
in a home brew pressure vessel made from an old pressure cooker and brought up
to about 25 psi. This collapses any air bubbles back into solution and
gives a nice solid part without any voids.