
It is with some reluctance that I write this column. I dread controversy. Experts will disagree with what I am about to say. Let me state for the record that this is my answer to the frequently asked question (FAQ) “How do I grind tool bits for a shaper”? I do not claim this to be the correct answer, but this answer has been helpful to me.
There are some lathe tool bits for which we will have little use on a shaper – such as the style E the thread cutting bit. By the same token there are a few shaper styles that have little use on a lathe – such as the T-slot cutting bits.
Also the clearance angles required can be much smaller on a shaper as will be described shortly. So basically shaper tools are different than lathe tools but...
Most lathe tools can be used on a shaper with good results. The extra clearance almost never hurts in amateur applications and most shaper owners also have a lathe and many lathe tools just waiting to be used.
Carbide tipped tool bits can be used on a shaper with light cuts but in general you will be happier with high-speed steel tool bits.

Myford High-Speed Steel Tool Bits
Photo by Kay Fisher
Speed and feed charts are misleading. They make too many assumptions. For instance they assume that you are concerned with removing the maximum amount of material in the minimum amount of time. While this is the reality of trying to run a machine shop at a profit, it is not the desire of the amateur. They assume adequate or flood coolant. Many amateurs work with no coolant or simply drip on a few drops of some (perhaps not optimal) liquid. They assume a robustness and sturdiness of machine that is frequently way beyond the means of most amateurs. It is not practical to assume that a speed and feed chart for a 16-horsepower 2-ton lathe can be applied to your ½ horsepower shaper.
Each material has a set of optimal angles for tool bits at a given speed and feed. One set of angles will give the best finish, while another set of angles gives the fastest metal removal. As an amateur machinist you have no production demands and finish quality only has to be good enough to satisfy yourself.
I’m not saying you should pay no attention to speeds and feeds. But understand that things have to be scaled down to reality. Tool-bit angles that are optimal for fast removal of metal from a large machine may not be optimal for more modest equipment and less demanding production schedules. Not all experts disagree on this point. In fact, in his book “The Amateur’s Lathe”, L. H. Sparey talks about this in detail and ends with this quote: “when in doubt, reduce the speed”.
A fellow amateur machinist for whom I have a great deal of respect, did some research and experimentation on tool angles and he came to the conclusion that 7 to 8 degrees is the answer to nearly every question. I have followed his advice and believe that indeed, for most cases, grinding every angle to 8 degrees works well.
It’s not optimal for cast iron and you must eliminate any rake for brass and bronze, but having a favorite angle can make grinding tool bits much easier. For rake, I double the 8-degree angle to 16 degrees.

Tool Bit Styles defined by ANSI B212.I-1984(R1990)
Drawing by Kay Fisher
The MSC catalog gives these descriptions for the tool styles shown above:
Style AR – Right Hand for turning to square shoulder. Used for general machining operations such as turning, boring, and chamfering.
Style AL – Left Hand for turning to square shoulder. Used for general machining operations such as turning, boring, and chamfering.
Style BR – Right Hand 15º Lead Angle for turning when no square shoulder is needed. Used for general machining operations such as turning, boring, and chamfering.
Style BL – Left Hand 15º Lead Angle for facing when no square shoulder is needed. Used for general machining operations such as turning, boring, and chamfering.
Style C – Square Nose for chamfering. A perfect general purpose tool of great utility for chamfering, facing, and turning. Tool can also be used to make special form tools.
Style D – Pointed Nose - 80º Included Angle used for undercutting and O.D. and I.D. chamfering.
Style E – Threading Tool. Standard 60º included angle for universal threading, V-Grooving, chamfering, turning, boring, and facing.
Style ER – 60º Offset Threading Tool. Tip is offset from the shank. For threading and V-Grooving to a shoulder.
Style EL – 60º Offset Threading Tool. Tip is offset from the shank. For threading and V-Grooving to a shoulder.
The styles are simply A through E. The R and L suffixes mean left and right. These descriptions are for use on a lathe. In a shaper, a right-hand tool will cut to the right whereas, in a lathe, it will cut from the right.
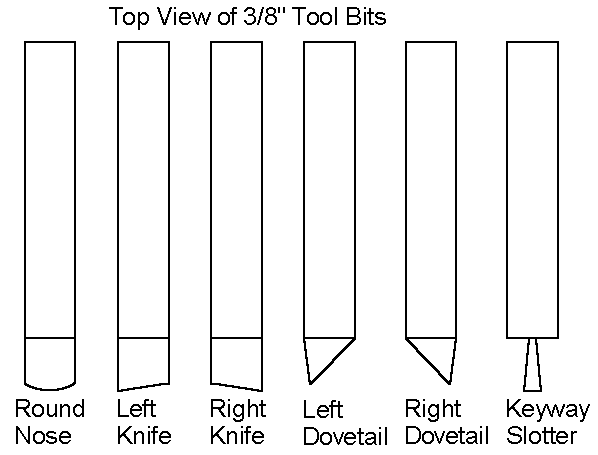
The drawing below shows a set of more practical styles for shapers. The round nose is the most versatile and you will end up with many versions of it exaggerating the radius in both directions. With a small radius you can cut down into grooves, with a medium radius you have the most practical shaper tool, and with a large radius you have a cutter for that classic shaper mirror finish.

Tool Bit Styles for Shapers
Drawing by Kay Fisher
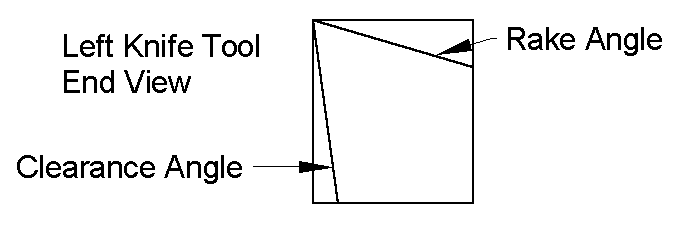
The Knife styles are used mainly for making vertical cuts. The reason you don’t normally make left or right cuts on the shaper is that it is much easier to reverse the direction of the cross feed than it is to rewind the table back to the other side for the next cut. So we want to cut in both directions (left and right) hence the popularity of the round nose style tool. Unlike lathe tools, on the knife tool we grind in both top and side rake. This gives the tool the ability to cut both sideways and down.
You can’t tell in the simple drawings but the corners on most tools have a small radius. This is usually applied by simply grinding to a point then honing in a small radius. If you don’t put in some radius then nature will add a rough one for you by chipping off your sharp corners.
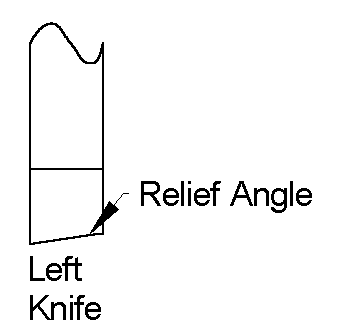
In general, more relief and rake makes a better cut, but makes a tool that dulls sooner and is at risk of damage.

Tool Bit Rake
Drawing by Kay Fisher
But no matter what you call it, rake is rake. With no rake the tool will tend to come out of the work and ride on the surface. With too much rake the tool will tend to dig in and pull the holder, and everything it is connected to, towards the work. Although rake is necessary, it is undesirable to grind rake, because this removes metal that would become the cutting edge in future sharpenings.
Armstrong style tool holders hold the tool bits at a 14 to 20 degree angle, eliminating the need to grind top rake. This way, a tool can be re-sharpened indefinitely. Also, the same tool can be used in a conventional tool holder for brass, which cuts best with no top rake.
Rake angles for steel and aluminum should be between 14 to 16 degrees. Rake for cast iron should be 2 degrees and for brass and bronze 0 degrees. My advice is to ignore rake and always use an Armstrong style holder except for brass and cast iron.

Illustrating an 8 Degree Clearance Angle
Drawing by Kay Fisher
It is precisely because clearance is not so important on a shaper that you can use the round nose tool to good advantage for cutting in both directions.
Lathe tools with 8-degree clearance angles also work well on the shaper.

Relief Angles
Drawing by Kay Fisher
Next month, in part 2, we will talk about tool posts, tool holders, and grinding repeatable angles.
Keep sending me email with questions and interesting shaper stories.
My email address is KayPatFisher@gmail.com.