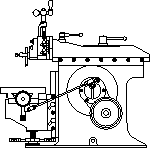
I was able to disassemble the little beast and got it into my basement shop.
Normally, upon obtaining a "new" machine, I would get it up and running first to see how it performs and what kind of things go "Bang!" in the middle of the night. In this case, given it was all seized up, there was no choice but to strip down to bare bones. I have one of those "Safe-T-Kleen" degreasing troughs - the Museum of Industry has one I think. The fluid in those things must have some Magic Dust mixed into it because when you finish washing a part and let it dry, it comes up real clean and without much of any residue left on it. Most other degreasers I have used leave an oily film on the metal.
My process of "renewing" is to first degrease, then wire buff, first with a heavy duty steel wire wheel, then a fine brass wire wheel. Any burrs or scratches will be hand filed off then the file marks rubbed down with a ScotchBrite deburring wheel. These are remarkable inventions that will buff anything to a bright finish. After that, I may use a cloth wheel and rouge to put a final luster on the part. For something like a ball handle or someone's wedding ring, I might also use one of those metal polishing liquids "as seen on TV" which you rub on with a rag then buff up like the shoeshine boy does. That deals with all the exposed metal surfaces. No scraping or re-fitting was necessary on my little shaper because it had virtually zero wear anywhere that I could find. As suspected, old Mr. Clapp must have had it since new and he had not used it that much. (How much does anyone use a shaper in their lifetime?)
The electric motor was interesting. As I said, it was seized up solid when I took it off. I pried it apart (carefully) and discovered it was in perfectly good condition. The main bearings were full of solidified goo - like steam oil. I soaked them in degreaser for 12 hours or so, cleaned out the bearings, air blasted them, then sprayed them through with WD40. They were fine. Re-assembled and a new power cord (obtainable from Home Depot), the motor run nice and smooth on the bench.
Next were the painted surfaces. Again, normally I would try to preserve the original paint scheme either by touch-up or "cut and polish". In this case, the paint was so chipped and faded, it was not recoverable. The alternatives were to give it an acid bath, have it sand blasted, or rub it down by hand with sandpaper. I chose the last and easiest course knowing it would not finish up as well as the first two alternatives. Partly because I was in a hurry to get it up and running and partly because I don't have access to the more thorough methods. I had left the primary pulley cover at the barn, which Henry picked up for me and dropped by. He had it sandblasted for me with another job and you can really tell that that part was cleaned up versus the rest of the machine.
After giving the badly chipped areas a rub down with paper, I taped up all the exposed metal surfaces - not an easy task by the way. Especially for the inside of the main pedestal where I wanted to give it a fresh coat of brown oxide heavy-duty primer. I always like the look of that on the "underbody" of machines. I then used 3 cans of the Professional Rustoleum Heavy Duty Primer all over the parts, including the underside of the base. I gave that 12 hours to dry, lightly sanded, then another coat. Next was the first color coat. I use that "John Deere" green on my machines – mostly because that is the color on my Hercus 9 inch lathe. (The Hercus is made in South Australia originally under license from South Bend. It is still made today in a modernized form with ball bearing headstock.)
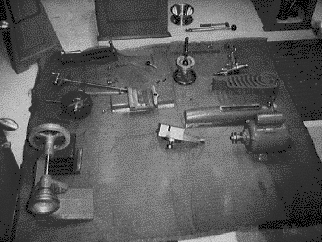
Parts Being Refinished photo by Rob McDougall
Now here is a mistake I wouldn't like to repeat. In my anxiousness to finish the machine I applied a second coat of color paint after waiting only 12 hours. The surface seemed perfectly dry to the touch and of course, I don't read instructions unless in doubt. So, as the spray went on, the surface, initially nice and smooth, turned into a "crinkle" finish as it all started to bubble up. These Rustoleum sprays require either 1-hour between coats or 48 hours, not 12. Oh dear, what to do. I wasn't about to strip it all down again to bare metal so I now have a crinkle finish on much of the shaper. I have rationalized it by saying it gives the machine old age character.
Final assembly! New parts required were two V belts, the power cord, and the little rubber bumpers that the belt cover sits on. Not bad at all I would say. All went together well. I adjusted all the gibs for smooth movement by hand. Oiled all moving parts as I put them together - I use 90-140 Mobil Gear Oil. I did replace the gib screw on the top slide, which had a 5/8-inch bolt attached to the end of it. This was the only damage on the machine where this gib had been tightened up by a wrench and had bent the gib. I straightened the gib in a vice by sight then surface ground it on the contact side. Then I made a replacement gib screw with a knurled handle integrated into the screw.
Turning on the machine with the belts positioned for the slowest speed – it started up beautifully. Ran like a clock. I let it sit on the bench running for about a minute. Turned it off and checked everywhere for anything coming loose, then started it and let it run for about 1/2 hour to "run-in". There is something mesmerizing about the way a shaper runs. The slow forward speed, the fast back speed, the quietness, and the peacefulness. Now eager to cut something I decided to use one of my Armstrong lathe tool holders with a tool bit, which I thought best matched the profile that Rudy had recommended at the workshop. Knowing the amazing surface that Rudy showed us, I thought I would try to get close to that kind of finish. I set up a block of aluminum in the vice, set the tool bit at the beginning of the edge, set the travel for a 1/4 inch lead-in and about 3/4 inch lead-out, then "let 'er rip!" Slowly the curls came off. Each cut, the table advanced 5 thou for the next cut. I took about a 5 thou depth of cut too. I couldn't believe the finish - like glass - better than I could have expected.
My last job of "re-conditioning" was to make a stand to put the machine on. I welded up a steel stand using 1 1/2 inch box framing and 1/4 steel plate for the oil tray/top surface and the shelf below. I welded on 3/8 inch feet and mounted leveling pads under the feet. That finished up the machine and I installed it into the corner of my shop between the lathe and drill press.
After now having a real working shaper for the past couple of months I am surprised how much I use it. I had thought I would use it 3 times during my whole life. Turns out there are a lot of things, that although they can be done quicker in the vertical mill, I prefer to set them up in the shaper for two reasons. One, it gives a much nicer surface than a 4 flute end mill or single bit fly cutter. And two, I can set up the part in the machine, turn it on and walk away. It is such a peaceful little critter that eats up metal in its own good time. It is also fascinating to watch - goes well with a cup of coffee. Much better to watch with a cup of coffee than that stupid hourglass on the computer while you wait for files to download.
If anyone is thinking of getting a shaper I can thoroughly recommend it to anyone who already has a lathe and a mill. Remember, they don't make shapers in our size anymore. They are a useful addition to the modelers shop and a piece of industrial history that is quickly becoming extinct.
(P.S. Any NEMES member that would like to stop by my shop and see it or wants to bring something over to be shaped, are very welcome to contact me and set up a time.)
Keep sending email with questions and interesting shaper stories.
My email address is KayPatFisher@gmail.com.